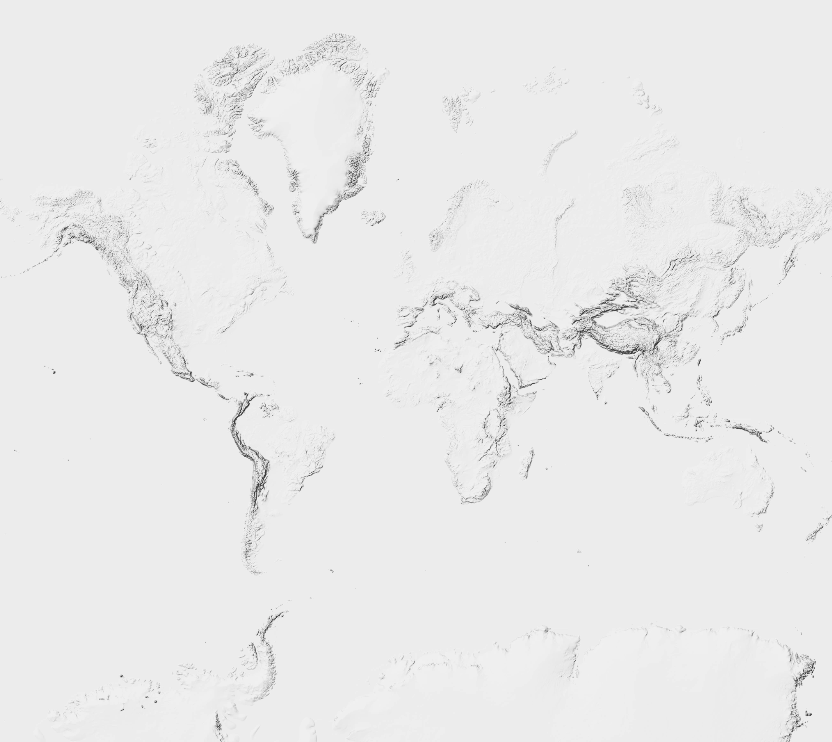
NIMBO Terrain (Hillshade)
The NIMBO Hillshade layer is a raster tile service providing a greyscale representation of the terrain’s surface. Unlike standard, on-the-fly generated hillshades, our layer is pre-processed using advanced cartographic techniques to ensure consistent lighting, maximized contrast, and artifact-free tile edges.
This pre-calculated layer provides a visually stunning representation of the world’s relief, optimized for both aesthetic appeal and topographic clarity. It is designed to be used as an overlay (with transparency/multiply blend modes) on top of satellite imagery or vector maps to highlight topography.
Technical Specifications
Section titled “Technical Specifications”| Feature | Details |
|---|---|
| Service URL | https://prod-data.nimbo.earth/tiles/hillshade/{z}/{x}/{y}?kermap_token=<YOUR_TOKEN> |
| Format | WebP (Grayscale) |
| Zoom Levels | 0 to 10 |
| Coordinate System | Web Mercator (EPSG:3857) |
| Coverage | Global Land (85°N to 85°S) |
| Tile Size | 512x512 px |
Integration Guide
Section titled “Integration Guide”The Hillshade layer is best utilized with a “Multiply” raster-opacity blending mode. This allows the shadows to darken the underlying map (satellite or vector) while keeping the highlights transparent, creating a natural 3D effect.
MapLibre GL JS / Mapbox GL JS
Section titled “MapLibre GL JS / Mapbox GL JS”Here is how to add the source and layer to your map style:
map.on('load', () => {  // 1. Add the Hillshade Source  map.addSource('nimbo-hillshade-source', {    'type': 'raster',    'tiles': [      'https://prod-data.nimbo.earth/tiles/hillshade/{z}/{x}/{y}.webp?kermap_token=<YOUR_TOKEN>'    ],    'tileSize': 256,    'maxzoom': 10  });
  // 2. Add the Layer with "multiply" blending  map.addLayer({    'id': 'nimbo-hillshade-layer',    'type': 'raster',    'source': 'nimbo-hillshade-source',    'paint': {      'raster-opacity': 0.6,       // Adjust intensity (0.0 - 1.0)      'raster-fade-duration': 0    }    // Note: MapLibre does not support 'raster-blend-mode': 'multiply' natively    // in the style spec yet, but standard opacity often suffices.    // For advanced blending, CSS composition filters on the canvas container    // or specific map renderers may be required.  }, 'your-label-layer-id'); // Insert below labels});
Desktop GIS
Section titled “Desktop GIS”Want to use Nimbo Hillshade for your cartographic projects in QGIS or ArcGIS?
- Tutorial: How to add Hillshade to QGIS Learn how to set up the XYZ layer and apply blending modes for professional rendering.
Methodology & Processing
Section titled “Methodology & Processing”Why use the Nimbo Global Hillshade instead of generating it yourself? We have applied a robust processing pipeline designed to solve common GIS visualization issues.
1. Adaptive Sun Control
Section titled “1. Adaptive Sun Control”Standard hillshades often look too dark when zoomed out or too flat when zoomed in. We utilize a Zoom-Dependent Parameter tuning (Z-Curve).
- Low Zooms (0-4): High vertical exaggeration and steeper sun angles to highlight major mountain ranges.
- High Zooms (5-10): Reduced exaggeration and “S-Curve” contrast adjustments to preserve subtle terrain details without over-saturation.
2. Visual Enhancement
Section titled “2. Visual Enhancement”Before generating the shade, the elevation data undergoes a slight Gaussian blur (to reduce noise) and Sharpening (to enhance ridges), followed by a non-linear S-Curve contrast pass. This results in a “cartographic grade” image that pops off the screen compared to linear renderings.
Next Steps
Section titled “Next Steps”- Get an API Key: Start integrating the hillshade into your apps.
- View the Terrain RGB Docs: Access the raw elevation data for analysis.
- How to add Hillshade to QGIS: Apply blending modes for professional rendering